
With so much content competing for attention on the Internet, do you ever wonder if you start a blog if your content stands a chance?
According to the journal Science, we have to process five times more information today than in 1986.
Our readers are overwhelmed. You probably are too.
So how can you make your next blog post stand out among the masses? Is the attempt even worth the effort?
You bet it is. And it’s easier than you think.
Visitors to your website read, on average, only 28% of what’s in front of them. So slowing them down long enough to take in your message is imperative.
And one way to slow them down, increase engagement – and boost comprehension – is to use visuals.
(Yes, I know you’re not an artist. Stick with me.)
The following are six types of gorgeous visuals that are easy to create and can double your blog’s traffic and engagement levels:
1. The Highly Shareable Image
See this image?

It’s just begging for shares on Pinterest, Facebook, and even Twitter because:
- It’s versatile, and works beautifully on a wide variety of social media platforms.
- It serves as an “advertisement” for your post content, enticing people to click through to learn more.
- It’s the easiest of all to create (you’ll see).
So how do you create an image that people will love to share?
Start by finding an image that reflects your post content. (Get my 12 Days of Visual Buzz series for more information on sourcing great images). Don’t choose an image that’s too busy; look for blank areas where you can fit some text. Or, create a translucent panel with one of the tools below, and position your text on top of it.
Then add the post headline to the graphic. To do this easily, use one of the following online image editors:
- PicMonkey.com: free with a paid Pro version
- iPiccy.com: free, ad supported
- Pixlr.com: free, ad supported
And make sure your text is large enough that it’s still readable when your image gets reduced to a preview size on social media platforms.
Include the name of your site somewhere in the image too, just in case it gets separated from the link back to your post.
If you’re using WordPress for your blog, set it as your Featured Image so social media share buttons can pick it up – and make a point of asking readers to share your post.
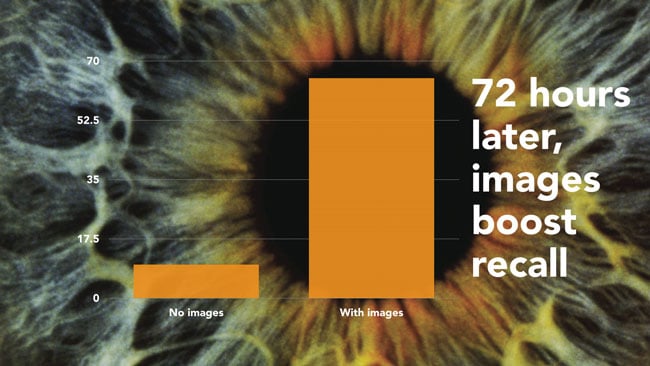
2. The Data-Driven Graphic
– John Medina, Brain Rules
Others may refer to data-driven graphics as infographics. But let’s avoid that term here so we’re not boxed in by what we assume an infographic should look like.
Think about it this way instead – sometimes you need to communicate data. Instead of quoting statistics or using a plain table, turning your data into a graphic is much more powerful.
Present your data in a form that makes it beautiful and engaging. And add layers of meaning by choosing photos or textures that communicate your message.
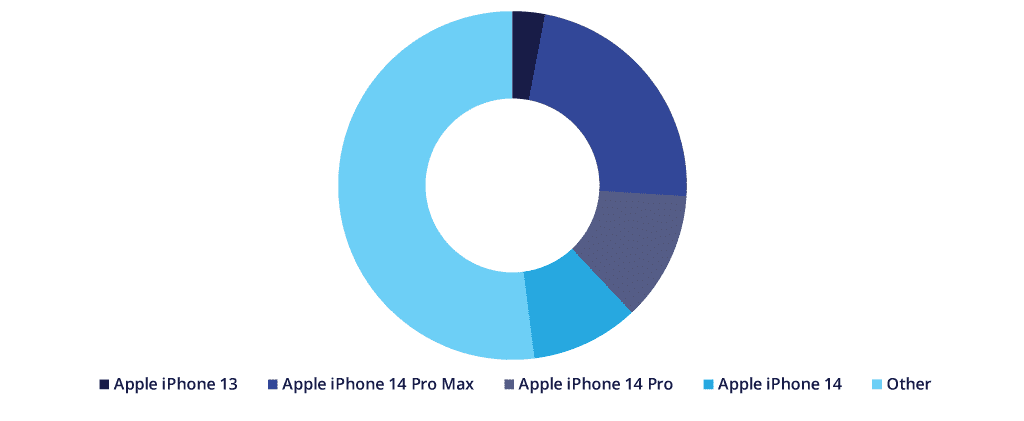
Take a look at the chart below from an article about Apple sales, for example. It quickly encapsulates the dominance of iPhones over other smartphones in the US market, and that is without using a lot of text.
You can easily create such data-driven visuals (without a design degree) with the following resources:
- Simple Diagrams is an inexpensive software program you install on your computer. It’s cross-platform compatible and creates graphics that look hand-drawn and accessible. It’s like artistic talent in a box!
- Easel.ly creates simple data-driven graphics using a series of visual themes you can easily modify. You’ll get great online help, and professional results. It’s in beta, and it’s free.
- Infogr.am helps you make your own simple infographics: no design skills needed. You must register to use it.
You may already have tools to create charts and other data-driven visuals on your computer – they’re built in to PowerPoint and Keynote.
What kind of data can you share with your readers? Try the following ideas:
- Make a graph of the most popular (or most commented on) posts of the past six months.
- Conduct a reader survey and share the results in an attractive pie chart.
- Create a graph that shows the most-popular topics your blog covers, in order of frequency – it’s a quick way to explain what your blog is about.
Just remember: you can create this kind of visual when the data itself is dry and you want to add a layer of meaning to keep it interesting.
3. The Behind-The-Scenes Photo
No, I’m not recommending you start filling your blog with selfies.
But asking a friend or family member to take a photo of you working on your blog isn’t a bad place to start. And if you occasionally work in some interesting places (a café, on the beach, or near natural beauty of any kind), consider showing this to your readers too.
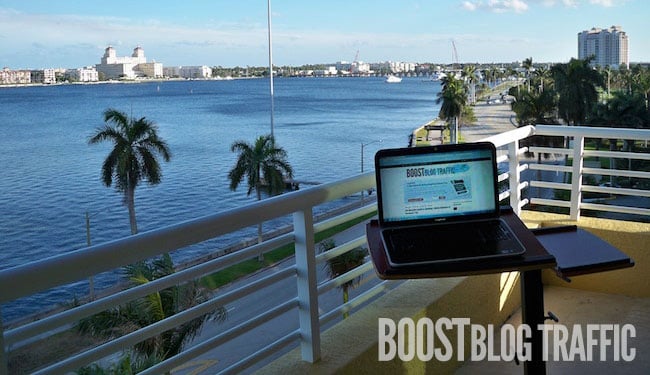
Behind-the-scenes images build intimacy and put a human face on your blog. If you have team members, share photos of your meetings and your work environment.
Use the resources mentioned in the first section to add text to your photos if you’d like. And spread them around – they work on your blog’s About page, within posts, and in your email marketing. They’re also effective on Instagram, Pinterest, Facebook, Google+ and even Twitter.
4. The 3D Packaging Shot
If you offer information online – ebooks, products, and even consulting services – an attractive 3D image helps your prospects visualize what they’ll get when they sign up, register, or purchase.
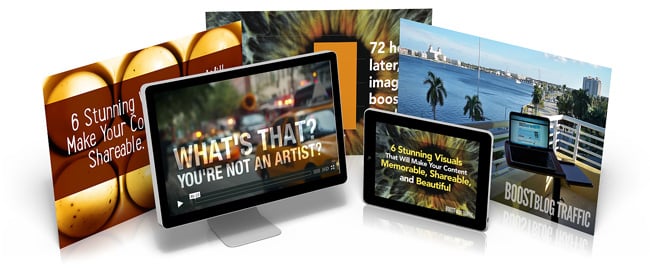
3D images make digital products seem more real and tangible. You can
- Use them right inside a blog post to show a downloadable item you’re giving away.
- Build anticipation with a peek at an upcoming product.
- Establish value by adding all the elements of an online product together in one composite image, as you see above.
A successful 3D image shows your digital product in the best possible light. Marketers call it a hero shot for good reason: it makes your product look epic.
My favorite resources for creating great-looking 3D product images are:
- BoxShot: A heavy-duty solution that gives you control over placement, lighting, and camera angles. Pricy, but if you plan to use it more than a few times, it will pay for itself.
- MyEcoverMaker: Strictly for book covers, this inexpensive option allows you to design your cover and create the 3D version all in one shot.
- BoxShotKing: No software to download; it’s all online. You can create a variety of cover designs and convert them to 3D versions right on the site. Download them and place them on your opt-in forms, sales pages, and in your sidebar ads. Available by subscription.
Even if you don’t have a product or service to sell (yet), use 3D images when you’re asking for anything – for example, an email address – in exchange for your ebooks, white papers, and videos. They make these “freebies” more desirable by bringing them to life.
5. The Do-It-Yourself Video
Adding video to your blog posts brings the information you share to life, gives you a way to introduce your readers to interesting people, and allows you to demonstrate techniques you’d otherwise struggle to describe with words.
You have a lot of options here, none of which involve standing alone in front of a camera:
- Combine photos, text, and music using Animoto for a fast-paced video that gets your message across (I used it for the video above).
- Record Skype interviews (with or without you making an appearance on-screen) with Pamela for Windows, or eCamm’s Call Recorder for Mac.
- Or keep it simple with a tool you may already have; Powerpoint and Keynote presentation software both allow you to talk over slides and record a video you can easily upload to your blog as I did here.
So what are the most effective ways to use video on your blog?
- You can drop videos onto any landing pages where you want visitors to opt-in to your email list. A quick video describes your blog – and what they’ll get from subscribing – will motivate them to sign up.
- You can also sell products and make money from your website with on-screen walk-throughs of you or your affiliate products or services. Show how existing customers use your offerings, and the results they could get.
- You can interview happy customers and incorporate their testimonials in a video.
And remember, don’t just post these videos on your YouTube channel: Facebook, Twitter, Google+ and Pinterest can all share videos now.
Successful videos are short and to the point – video viewers are an impatient bunch, so keep it moving and you’ll keep them engaged. As a rule of thumb, try to keep promotional videos less than one minute. A product walk-through or how-to may need a little longer, but try not to exceed three minutes.
6. The Slick Slide Deck
When you have a lot of information to convey, and you’d like to give readers a takeaway they can download and review later, consider creating a slide deck.
They’re an easy way to reinforce your key messages, and they add an extra layer of interest to your post.
SlideShare is owned by LinkedIn, and if your readers fit the LinkedIn demographic, SlideShare is a great way to reach them.
You can embed a SlideShare presentation in your blog post and on your LinkedIn profile like I’ve done above.
You can share your deck to all the major social media platforms. And SlideShare is a content platform in its own right, so people can discover your content without even knowing about your blog. If you’re really lucky, your presentation may be featured on the SlideShare home page, like this one was.
Slide decks are also easy to create with tools you may already have:
- PowerPoint and Keynote both feature a wide range of visual templates.
- OpenOffice Presentation is a free, open-source slide creator tool.
- Haiku Deck helps you create simple, beautiful slides with its web and tablet-based apps.
The prevailing wisdom from the PowerPoint pros is to use the minimal amount of text on slides. But if you plan to embed your slide deck on SlideShare, it must have enough detail to stand alone, so don’t be afraid to set up your slides so they tell a story all by themselves.
When are slides the most effective option for a blogger?
- List posts lend themselves perfectly to slide decks.
- Posts that explain a process step-by-step are also a good match.
- FAQ-type posts work well too.
Any information-dense post that you consider to be foundational information your readers need in order to interact with your products and services is also a good candidate.
It’s Time to Get Visual with Your Blog
If you’re feeling a bit overwhelmed by all the options, I have a suggestion.
Stop thinking about these visuals as art, and start thinking about them as visual communication.
Researchers at 3M concluded that humans process visuals 60,000 times faster than text. Communicating with visuals is like sending your information on a rocket straight to your reader’s brain.
Start with something easy. What’s the easiest image to create on the list above?
It’s a toss-up between #4, The Behind-The-Scenes Photo (which you may already have), and #1, the Highly Shareable Image.
Learning to communicate visually is no different than learning anything else for the first time: it gets easier the more you do.
So choose one of the easy-to-create image types, and commit to adding it to your blog post this week.


I love how all your visuals relate back to your own post. Clever.
We called this one the “Inception” post behind the scenes, Alicia. Visuals, inside of visuals, inside of visuals … 😉
Well done! 😀
Jon,
LOVE it. I’m working on creating graphics to share – so much to learn!
Thanks for sharing the ideas and the links to the tools! I’ve been using picmonkey, and like it. I’m looking for a way to make a translucent text background. I have not found that yet with picmonkey. More research….
I appreciate you.
Tom, in PicMonkey you can go to Overlays > Geometric. Choose one of the shapes, then in the dialog box that appears, pull the Fade slider to the right until it becomes as translucent as you’d like.
Great post! As a writer–that is, someone who thinks in terms of words instead of images–I struggle to make my blog posts as visually appealing as I know they could be. In my last blog post, I forced myself to create some super, simple graphics in Powerpoint to illustrate a concept about how to change the world. My readers noticed. I’m bookmarking this post to help me do more of it. Thanks for the push!
Amazing what a few simple visuals will do, isn’t it?
And they don’t have to be super polished: sometimes I think readers relate even more to something that looks handcrafted and “real.”
The Behind-The-Scenes Photo is one of my favorite way to make a connection with my readers although I will be experimenting with The Slick Slide Deck in the future. Thanks for this great post!
I haven’t done this yet, but LOVE this idea. Putting it on my list 🙂
Awesome post, Pamela! So many useful tips here, I will definitely implement some of these visuals for my content 🙂
Thanks again, for sharing this with us!
Great tips, Pamela
And spot on recommending simple photos to ensure that your text pops. That is one of the biggest mistakes I see people make- text over complicated backgrounds or backgrounds that have high contrast makes your message difficult to read.
I’d also add making sure that the font is not distracting; and that the color you choose for the font is high contrast compared to the photo. The eye naturally goes to the area with the most contrast.
Great tips!
Your message is on target and timely. I’ve seen a few posts regarding the tools to create these necessary visuals. A good one that I didn’t see listed here is Canva.
Canva seems to hold a lot of promise: thanks for mentioning it, Olympia!
You provided an elegant and powerful guide with this post, Pamela. Sometimes I feel like I am traveling at “warp speed” as I learn how to be a better blogger. Apparently, I am not the only one.
Using visuals as a communications tool make perfect sense. Humans are hard-wired for visuals. Primates looked to learn about their environment long before humans could describe it. We emulated our parents and elders as children by watching them before they could tell us what works.
The fact that you could cover visual communication in both scope and depth is a testimonial to your writing skills. I had been pondering about using SlideShare and which tools to use to maximize my impact using SlideShare. Now I know!
Thanks a for a great post. You have taught me a lot!
Thanks so much, Dave.
I agree: we see before we process words. Visuals are a great way to activate a reader’s brain before they even begin to read.
Pamela, thank you for such a great post. As a marketing consultant to local business owners, I am always saying how images are important to sharing your message. I will definitely be sharing your slideshare deck to my community. Again, thanks for the awesome information. I picked up several useful tools from reading your post.
Great resource post, Pamela. I’ve used many of the tools you recommend along with the old standby, Photoshop. I find that visuals work well to draw people into the story, and they also work well on social media like Pinterest and now Twitter. In fact, I get more outside traffic to my site from visuals shared on Pinterest than any other source. The good news is, with tools like PicMonkey, the average person can now create wonderful graphics with text for their sites.
Great tips! I would like to add one for bloggers using Pinterest. Your graphics should be vertical, not horizontal like these examples (twice as long as they are wide at least). These graphics are pinned much more frequently.
Great point, Melanie.
I often make a vertical version of my post image, upload it and use it as the Featured Image so that people sharing the post on Pinterest can grab the vertical image to share.
Wow Pamela! This is absolutely amazing stuff! I was amazed to see the way you placed the video along with all the tips around it. Thank you for sharing this incredible stuff!
Have a great weekend!
Regards,
Kumar
Pamela – Wow, where do I even begin? This was one of the most helpful posts I’ve read in a while. So much great content and so many ideas! Thank you for taking the time to write such a helpful article. I have used some of these strategies on my own blog, but you have given me a lot of food for thought. Thanks so much!
Thanks Pam – I’ve had image envy for a while now for those who’ve figured out how to use images really well in their posts. Its been on my to-do-list to figure out how to do the same, but just haven’t gotten to it yet.
It is super important that we focus not only on writing all the magic words to get our point across, but also think through and implement the right environment that will get our readers and customers to grasp what we’re saying, remember it, and move to action as a result. And adding stunning visuals is a fantastic way to support our written word.
Thanks so much for the comprehensive list of resources – they will come in handy, and will help me get rid of my image envy!
“think through and implement the right environment that will get our readers and customers to grasp what we’re saying, remember it, and move to action as a result. ”
Exactly! Visuals create a great environment for your words to shine. 🙂
Wow, Pamela – great post!
Years ago (think Windows 98 days) I got fairly proficient at Photoshop, but didn’t use it again for many years. Since then, I’ve felt like a first grader whenever I had to do any graphics myself (and they kind of look like they were done by a first grader!) 😉 Thanks so much for this. I’m sure it’s a resource I’ll be coming back to again and again.
Go for it, Leanne! The more you do them, the easier they are (and the better you’ll get).
Some much useful information. Many thanks for sharing!
This post was incredibly helpful.
Writing great posts has been such trying work that to think of using images was almost too much. This post makes it seem very doable and a joy.
I shall be implementing your Slide share or similar on LinkedIn soonest.
Thank you!
LOVE this post. I use a lot of imagery in my website that I then pin to Pinterest as well as doing a book trailer for my upcoming novel. Such fun! I also read, maybe it was here, to add a picture to your FB and Tweets, they get viewed, liked and shared more 🙂
Thanks again Jon. LOVE it!
~ Tam Francis ~
http://www.girlinthejitterbugdress.com
Jon and Pam, my fingers got ahead of me 🙂 Pam you’re amazing thanks for having her Jon!
This is really great stuff. One of my struggles that I’m trying to fix, is choosing images for my blog post that actually relates to the topic. But some of the suggestions you shared here, are simply gold. I made sure to bookmark this page, and made a sticky note of this web address because this is very useful for me.
Thanks.
Hey there Pamela –
Since I use images a great deal on my blog, your post is right up my alley. I love images and they do enhance the look of the article written, and if they’re used correctly they will draw the reader into the post.
I’ve used ecover maker for ebooks before and it’s a pretty good site. Have never used boxshot king but will give it a look-see. I use Laughingbird software when I want to do my own or scour the Internet for images.
I have to say that I disagree with using a translucent panel over images. To me they detract from the image, text or no. I would much rather just put the text over the image rather than add a panel. But that’s me.
I need to start putting my logo on my blog images as in your example. I do on my facebook fan page images and I should do it for my blog as well.
Thanks for a fun and informative read. BTW – Jon good webinar on Tuesday. Thanks.
Have a great day,
Donald
Thanks, Donald.
In a perfect world, you’d always find an image with a nice blank area where you can overlay text. But when you find a great image that doesn’t have an area like that (like the first one in this post), a translucent box gives you a way to use a strong image and add text.
Pamela, this is a great post with extraordinary images. I make sure to use a number of images in each of my posts, but now that I see what can be done with them, I cna see I need to do some retooling.
Thank you, not only are your images great but the way you talk about using graphics shows your expertise.
You might also want to check out https://placeit.net/
This is free and has dozens of photographs with an open spot to place your image in various phone and computers types and brands. It can be somebody holding a phone in their hand or an image of somebody typing on a laptop. Lately they have added a few fun things like a magazine, bus shelter, even a credit card! All you need to do is type in a URL or upload a picture. As far as I can tell the premium plan only lets you store your downloads in your account.
Very cool, Reid: thanks for sharing that resource. It looks great!
Pamela, I just looked at it again and I see it isn’t as great as it used to be. It used to be that you just downloaded the images and that was that. But now thing they are watermarking the photos. I’m going to look at it more later. I suspect there may be some charges.
Reid, I’d love to hear what you find out, so feel free to report back what you discover.
In the meantime, even if you have to pay a small fee, 3D images are typically used in a sales context, and a really good one should make you a lot more money than it costs to produce. So as long as they’re not charging an exorbitant fee, it might be worth it.
Hi Pamela,
They’ve really done a lot with the site since I was there last. In addition to a host of new product shots in realistic environments, they now offer “Blender,” which allows you to select between various environments. What’s cool about this feature is that some of these environments are big and wide, so they would work well as a header for a website or a Facebook Cover. Imagine a beautiful park scene with a hand holding an iPhone or iPad, with your product image. They also offer little animations, that they call “Workflow.” You upload a bunch of pictures and then you can make a hand look like it’s pulling them from right to left on an iPad. It’s a GIF, so it can be a really cool way to display a simple slide show on your blog. (and of course Pinterest handles GIFs now). After you finish making your picture you click download and then you’re presented with various price options. There are watermarked 640×480 images for free if you abide by their usage agreement, which includes linked attribution (no big deal). And then there are a lot of bigger images with more rights. Usually about $5 or $8. If you use this a lot, they offer monthly plans, including one which is called “comp,” which leaves the watermark on.
All in all, pretty cool.
Another thing to remember is fiverr. If you don’t know the site, it’s where people do all these amazing things for $5. So… if you want to see a very realistic book cover, check this out: http://bit.ly/1dtDRNX People can illustrate and do all kinds of videos for you on Fiverr for $5 (except it usually ends up being more to get all the features you want.)
What a wonderful post Pamela!
I’ve always considered myself to be graphically challenged (as a copywriter, it’s not usually an issue) but I greatly admire the creators of lovely imagery.
You’ve made it seem a bit more accessible though and I’ll definitely be giving your tools a go. Thanks!
I’ve really gone “heavy” on the visuals on some of my blogs over the last few months. And the results so far have been amazing.
Not only am I seeing lower bounce rates and better search engine traffic but I’m also seeing Pinterest as a top 5 traffic referrer on every blog I’ve tested it on.
90% of what I’ve done involves your first tip – essentially making a text/image mashup to share on Facebook, Twitter, Tumblr and Pinterest. And I’m finding that the images are getting a *lot* of shares which drives traffic and new social media followers.
As a side note, I use a number of tools to make these that are not mentioned above – feel free to check out my “hotlist” at: http://www.techtoucan.com/top-10-free-tools-for-creating-unique-images-for-your-blog-and-social-media-profiles-90241
Good to know you’re getting results, Richard. I’ve found that little extra effort to create shareable images makes a big difference.
And thanks for sharing your list. You’ve got some good resources there, and some fun ones, too!
Pamela, this post took way above average time to get through – which in this case is a mega-cool! It’s a treasure chest of resources – the time invested now to discover ’em all [thanks to your post] will be dwarfed by the time & quality gained down the road. Long story short: Thanks A Bunch!
PS. Just in case I purchase some of the tools [my blog isn’t launched quite yet], would you have affiliate links?
Hi Beat,
Thanks for the kind words.
Most of my products have affiliate programs: once you’re ready, just contact me via Big Brand System and I’ll share where to sign up for them.
Thanks Pamela, great information! My mediocre artistic talent needs all the help it can get 🙂
I see! Thanks.
This is amazing. You have opened up a whole new world for me and my blog. Thank You! I have already added text to a photo and it looks great. Not sure how to add my URL though so that it has a live link. Learning as i go.
This was an awesome post, and I’ve already made an infographic from easel.ly based on your recommendation. I can’t wait to try the other tools as well! I’m inspired!
Good for you for digging right in, Hanna! Glad to hear you were inspired to action. 🙂
Perfect timing! I’ve just started pulling together quotes and other content to use on my blog. Plus, adding the Pin This plug in so readers can automatically pin the images directly to Pinterest.
I’m just getting started, and while I’m a bit overwhelmed by all these options, it’s fantastic to have them all in one place.
Thanks!
I really like the DIY Video and SlideShare ideas. A wealth of info!
This is SO helpful!
Thanks tons!
Wonderful post!
One comment, the 3D packaging shot….it’s called Skuomorphism. There’s a whole theory behind it 🙂
Hi Pamela,
Thanks for an excellent post. I totally agree with your point about the value of visuals in a blog post. I haven’t started using videos extensively on my blog yet but I have found prominent photos make a huge difference. It also gives the blog a much more professional look.
I got this awesome deal via appsumo dot com where I picked up 100 photos from deposit photos dot com for an absolute steal. They have a fantastic (and more importantly easily searchable) catalogue of photos and I can recommend them highly.
Thanks for another excellent post.
🙂
This is a brilliant resource, and I shall share the link around.
I often talk about total communication and presentation matters, but like other wordy folks I don’t naturally throw in a lot of visuals – so this will be a combination prod and handhold!
Great post with a discovery of lot of new, easy to use visual websites – from infographics to 3D covers. Extremely useful!
I would like to add http://www.Storyboardthat.com for creating visual storyboards really easily.
Thanks
Sharad
It’s a good reminder I have to have a visually attractive blog (I don’t think it’s the most beautiful one available right now). It doesn’t have to be astonishing, just simple and attractive like this.
As usual, you’ve composed a highly actionable post with terrific tips and tools. The big takeaway for me appeared in the video: It’s not art. It’s visual communication. That distinction makes all the difference.
Pamela,
Great post and super job on all the helpful links; I always appreciate posts like yours.
After reading your article I’m sure everyone understands the value of adding images to their blog posts. But something else to consider is the image that goes with your Google Authorship profile.
As an experiment I just Googled, “Using images in blog posts.” On my screen there are eight posts showing above the fold – three with Google Author images. Your (my) eye is immediately drawn to those posts with an image of the author. It’s as though your eye has a mind of its own (I guess it does;-) – zeroing in on the tiny photos.
The desire to look at images – especially of people – is something ingrained in all of us; we are attracted to things that are like us. Use a meaningful photo to be sure – but use any image as opposed to none.
Having been a portrait photographer for 18 years I’m contemplating setting up a small shooting area in my basement and creating my own blog post images. The challenge of course – weighing time spent creating images against that which I could be writing. We’ll have to see.
Thanks again for the insights. Have a great week.
Great post, Pamela. Appreciate the resources and encouragement to experiment with new visual approaches. And you’ve answered the question of how to create that translucent layer!
I find myself enjoying posts like these but rarely taking the time to actually execute. I tried a new plan today, I took the first suggestion and just did it – haven’t even read the rest of the post yet.
Guess what, it was worth its weight in gold just being introduced to picmonkey.com and pixabay.com. I literally just updated three feature images on some of our blog posts and made them way more cooler. I didn’t know how easy it was until this post – I figured you needed advanced photoshop experience…silly me.
Thank you very much Jon.
Brian, that’s great to hear.
I think you’ll find that the more you create those post images, the easier they get. Plus, you tend to develop a style that you can go back to every time, so it’s pretty fast to put them together. Thanks for letting us know!
This couldn’t have come at a better time. I’m about to get rid of the slider on my home page and replace it with a static image with overlaid copy. As a daily user of PicMonkey already, I’m really glad to know I’ll be able to create a visual like your first example. Thanks Pamela!
Such practical, simple and effective tips. I would come back in few hours and read the post again and again to grasp everything and start working on these points ASAP. Thanks Pamela for sharing your insight. Its pure gold!
Great post with useful information. Many thanks for sharing!
Pamela,
I absolutely love idea #1. That makes total sense now that you’ve explained it’s purpose. At times I’d see images like that in the occasional blog post and I would wonder why they spent that extra time to create or have someone else create that blog post titled graphic…
Awesome post. Very informative and useful.
@JonMorrow Pamela’s a great guest post writer thanks for letting her share her insights with all of us.